Wednesday, May 30, 2012

{Challenge} Sizzix Bigz Die


Posted Image
Shelly here with a challenge you're going to DIE for! Use any Sizzix Bigz die to create a card, embellishment or layout! Here's my example using Sizzix Bigz Die Flower Layers #9Flowers, 3-D #2,
Here's how I created my 6x6 card: I started with a piece of 12"x6" dotted swiss cardstock and folded it in half. I used a 5x5 die to create the black background mat. Next, I cut several pieces of felt, netting, and newsprint brown paper bags and two different Sizzix Bigz Dies to create my three flowers. I used Distress ink on one of the felt flower layers. Use a crop-a-dile to punch a hole through all layers and use a brad to hold it all together. I used glue dots to adhere the felt/paper flowers to the card front. Tie a 6" piece of ribbon into a bow and place upper left. Use circle die cuts from Pea Pod Parts to create layered lower right greeting. Use a small "Thanks" (or whatever is appropriate for your needs) onto the circular journaling spot. Use pop dots to create added dimension.
Remember the Sale going on NOW until May 25, 2012:
Sizzix Bigz Dies - $11 for $19.99 regular priced dies!!

Posted Image
http://img.photobucket.com/albums/1003/lverburg/AWDML%20Photos/AWDMLSuppliesGraphic.gif
Sizzix Bigs Dies UsedFlower Layers #9, and Flowers, 3-D #2, Accucut 5x5" mat
Cardstock: Bazzill Swiss Dot
Felt: Stamp School Whip CreamMy Favorite Things pack
Misc: 6" of ribbon, netting, paper newsprint bag
Adhesive: Glue dotspop dots

Tuesday, May 29, 2012


Join me, Shelly Maxwell, Wednesday, June 13, 2012 6-8PM, to create five masculine cards using Bo-Bunny's Weekend Market paper line, Indie washi tape, twill, twine, Claudine Hellmuth So Retro and Stamper's Anonymous Tim Holtz Road Trip Stamps, and the following Copic Markers: BG10, E15, E13, YG95, YG99, B02, Blender, YG000, YG00, YG01, C0, C2, C5, C8, B41, B45, BV20, Spica Glitter Pens.

 We will create Happy Birthday, Thinking of You, Thank You cards and a few more! 

Please bring to class: small pointy scissors, pop dots, glue dots, tiny attacher (or borrow mine), your favorite adhesive. Cost $19. Reserve your spot by registering at The Scrapbooking Studio (309) 736-7242.

Saturday, May 26, 2012

{Stamps & Dies} Sizzix & Hero Arts

Sizzix and Hero Arts have teamed up to create another great collection of stamps and dies that will be sure to inspire you in many ways! Shelly here with some card samples I've created using some great tools from The Scrapbooking Studio. 
This card was created using the Sizzix Hero Arts Garden Flowers Set:
These stamp and die sets are easy to use. Place the rubber cling stamps onto an acrylic handle. Stamp your image. I used Copic markers to color in my images. Place the Framelits die over the stamped image(s) and use your Big Shot or Vagabond to cut out the images. You will LOVE the results-and it's so much fun too.


This is a flip-its card I created using Sizzix Diamond Flip-its designed by Stephanie Barnard and then I embellished it with stamped, colored and die cut images from the Garden Flowers Set. 


I used Simple Stories Fab{U}lous & Bella Blvd. patterned papers.

Tuesday, May 22, 2012

{Tips & Techniques} Ranger's Liquid Pearls


Posted Image
Hi Scrappers, Shelly here with a few Tips to share with you about Ranger's Liquid Pearls. I've been using Liquid Pearls for several years and I love their subtle dimension and luster.  Liquid Pearls work great on layouts and cards. Here's a layout I would like to share with you that I used a few different colors of liquid pearls on:
I used Ruby Red on the white border strip (got this awesome die cut border strip thanks to Angie over at The Artsy Cottage) and White Opal around the red felt die cut circle. I ran out of asterisks to use between letters so I punched a small flower to use as my last spacer between the letters in the work "Long". Here's a close-up:
What I like about Liquid Pearls is that they add dimension WITHOUT a lot of bulk! I attached the oval quote using dimensional pop dots and I also used a Tim Holtz distressing tool around the edges of the shape. The Stampin' School Felt cut like butter with my Spellbinder die and Vagabond!

 And now here  is the technique I use to apply Liquid Pearls and also a few tips I would like to share:


Technique: Start applying the Liquid Pearls with the applicator tip almost completely on the paper's surface.Gently squeeze the bottle creating a little tiny ball of "goo", bring the applicator tip out of the ball creating a tip on the top of the "goo" or "pearl". Think of this as if you are decorating a cake with a frosting tube.


TIPS:
1. Less is more! Don't glob on too much-you can always add more; but it's hard to take away an excess amount. (This is a newbie mistake).
2. Practice, Practice, Practice!
3. Store the bottle with the down-so the product is always ready to go.
I created this card using the Nostalgic Kraft core paper, and Accucut die, a "Happy Birthday" sticker from Doodlebug, Adirondack Lights Snow Cap white pigment ink onto the black paper looks really col. I added a bit of dimension with the White Opal flower centers created with the Liquid Pearls.
Don't forget this week's sale:
 SALE: Ranger Liquid (Dimensional) Pearls $1.50 
http://img.photobucket.com/albums/1003/lverburg/AWDML%20Photos/AWDMLSuppliesGraphic.gif
Ink: Adirondack Lights Snow Cap Pigment Ink
Stamp: Great Impressions G375
Other Embellishments: Ranger Liquid Pearls-Ruby RedWhite Opal, and Dark Chocolate, Felt: Stamp School wild cherry, Letter Stickers: American Craft Thickers: Puffy Honey Black, and Doodlebug: Happy Birthday Multicolor, Ribbon: Stampin' Up

Posted Image

Monday, May 21, 2012

SALE: AWDML Sizzix Bigz Dies $11 for 19.99 MSR


Remember the Sale going on NOW until May 24, 2012:
Sizzix Bigz Dies - $11 for $19.99 regular priced dies!!
 There are a lot of great examples on the AWDML Blog!


Saturday, May 19, 2012


Posted Image
Hello, Shelly here with this week's Fantastic Friday Sale: Ranger's Liquid Pearls.  Liquid Pearls are a versatile pearlescent paint that can be used on paper or fabric craft projects.Liquid Pearls Decorative GlueI used them on this 6x6 card as a dimensional embellishment around the circle die-cut pieces. I used several different colors to create more interest.
Easier to use than brads (and cheaper too), Ranger's liquid pearls add a shiny touch...
They feel great when you run your fingers over the dried pearls.

Paper: Cardstock-Kraft Bazzill, Stamp School Bubblegum Pink and Snow Cone , Patterned paper-Simple Stories Sassy
Liquid Pearls: Dark chocolateWhite OpalButtercup, and Mint Green
Ink: Stamp School-Blue Raspberry and Wild Cherry

{Cards} Adding the "Wow" Factor


Create a great "Wow" factor when you add a few beautifully fluffy flowers taken from Maya Road's ribbons available at The Scrapbooking Studio. Make the card perfect for any occasion when you add Pebbles word stickers like the one below "Thinking of You". 
Woodgrain embossed cardstock is another great way to add that "Wow" factor to your cards! Cosmo Cricket's embossed cardstock papers (available in awesome pads) are the perfect thing to grab along with a Ranger sanding tool to bring out that inner texture.

Use a Copic marker to color clear acrylic Maya Road baubles like the one I've included here in the upper right corner of this 6x6 card. They work great on wooden pieces like the pretty butterfly above too.
 Use Copic markers to color Prima white flowers as well-that way they will match all your projects perfectly!

I used Simple Stories Fab{U}lous to create all three of these cards.
 Create something pretty today!

Tuesday, May 15, 2012

{AWDML} Tips & Techniques

Head on over to the AWDML Blog to see what I have to share with you today. I promise you won't be disappointed!

Saturday, May 12, 2012

{New Sweet Tooth Layout Kits} Believe, Bloom, & Cheer


Here are three new layouts I would like to share with you today. Each kit includes all pre-cut photo mats, die cut shapes, flowers, buttons, borders, tags, ribbons, etc. just as shown in the photos. You'll  want to make sure you place your orders online now to assure you get all the kits you want.
Each kit includes color photo instructions.

Fantastic Friday Sale at AWDML-Check it out!

SALE: Ranger Liquid (Dimensional) Pearls $1.50 

{Layout} Simple Stories AwesoME


Blake, our newest addition, is ALWAYS looking for trouble! You would think we would learn to put our shoes away after loosing 4 different pairs in one week (some of mine included). We think Blake might be a Border Collie/Australian Shepherd mix. The action packed line of papers from Simple Stories was the perfect match for this pooch's personality! The AwesoMe line from Simple Stories is a great "guy" line for boys who are a little older, great for young teen cards too! Check it all out at The Scrapbooking Studio, Moline, IL

Thursday, May 10, 2012

New Sweet Tooth Layout Kits!!

Check out all the newest kits available NOW at Sweet Tooth Scrapbooking, LLC


This FIVE PAGE layout kits was created using Echo Park's newest line for the summer. You can complete at least five one page layouts using all the wonderful goodies included in each Summer themed kit-photo mats, die cut images, borders, buttons, brads, and flowers plus lots more to create exactly as instructed or use all of the parts and pieces to create or customize your own pages. Order HERE.


Dust off your sleeping bag & weenie roaster-it's camping season! Don't forget to capture all the fun on your next family excursion and then quickly record those wonderful memories with this Sweet Tooth layout:


You'll want to order this light-hearted layout kit "Happy Camper" to include in your scrapbook. Order HERE.

Monday, May 7, 2012

Maya Road Bingo Markers used as anchors!


Posted Image
Shelly here with a one-page layout I created using several great items from the store; but I wanted to draw special attention to the Maya Road Bingo Markers on sale this week. The markers work great as embellishment anchors! (The wooden buttons from Maya Road are great for this too).  Here's my layout:

You can see that I used the bingo markers along the lower edge of the photo strip to anchor (connect) the photos & also to  visually create a triangle between the lower two and the upper marker on the right edge of the layout. TIP: Did you know that creating visual triangles across your layout creates interest for the viewer? Work in groups of three and see how many triangles you can create on your next card or layout. Items like the bingo markers from Maya Road really help guide your eye across the page creating visual interest.
Don't forget the sale this week at AWDML:
All Maya Road Bingo Pieces are on sale this week for $3.00. See what’s available HERE.
Posted Image
http://img.photobucket.com/albums/1003/lverburg/AWDML%20Photos/AWDMLSuppliesGraphic.gif
Embellishments: Hambly Overlays, Maya Road wooden buttons & Bingo Markers, Studio Calico fab Strips & journaling card used for title block, Thickers
Felt: Stamp School Whip Cream & Wild Cherry
Dies: Spellbinders Beaded Circles, Sizzix Stars #2
Twine: Twinery
Adhesives: Glue DotsPop Dots

Saturday, May 5, 2012

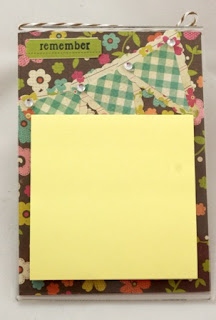
{Project} Post-it Note Holder


Shelly here with a quick and easy project: Create a Post-It Note holder
  1. Using an inverted 4x6 acrylic photo frame and Simple Stories Fab{U}lous papers cut a piece of patterned paper to fit into the frame.
  2. Use a punch or die to create a layered pennant across the top of the holder.
  3. Stamp the word "remember" on a small label piece of matching paper and adhere just above the banner. Place the patterned paper piece into the acrylic frame.
  4. Place Bazzill clear bling on the exterior of the frame where the pennant pieces connect.
  5. Wrap Twinery twine around the top of the frame and tie into a knot.

Remember: I attached the Bazzill bling on the outside of the acrylic frame.

This adorable holder looks oh-so-cute compared to the drab old pad all by itself! 
Stop by The Scrapbooking Studio today to pick up your papers, bling, twine and more.